Several of my friends are starting to grow some of their own food and have lots of questions, so I write and include links with them in mind. A few of my friends also like to read about our Gardening Adventures each year, even though they do not have space or the ability to grow for themselves just now, so......

We decided to make permanent Beds last year, and are now sticking with the tried and true methods we've learned through experimentation over the years. Since we are both in our late 60's, we are becoming aware, we can not increase-experiment with our Garden Beds as much. We may try one or two new veggies though, just for fun. We love hands on learning and trying new things. Hubby will be experimenting in the Greenhouse though, as he's adding an additional Hoop House and has some ingenious ideas he wants to try out; we look forward to using it as a Sunroom in the Fall, Winter and Spring in days to come.

A friend who manages a Farm, treated us with lots of composted Mature and we filled our freshly made Raised Bed and Plastic Barrels with it last season. We left the bottom open to the ground and made 3 beds out of each barrel. If you plan to move-pull them around, do not cut out the bottom. You may be able to find them through Craigslist or a local Horse Vet, who receives meds in them, Vets usually give them away and some local farmers are willing to give away or sell composted mature for a good price and some will even load it in the back of your pickup with their Tractors, saves on the back. Co-ops such as Southern States will often sell broken bags for half price, perhaps Lowes or Home Depot will as well???

Here is a picture of one of our Barrel Container Beds, this one has some lettuce growing in it.


Just like with our own Spiritual Life, the right amount of Light, Water and healthy Soil is very important and keys to an abundant crop and Spiritual Growth. Not only does it produce larger and a more productive harvest, but the plants are able to receive nutrients from the soil that our body needs. If you do not Top-Side Dress or add nutrients to the soil via Manure Tea and the like, the soil can become depleted and that will affect the amount of nourishment you put in your body, through the food you grow. That is one of the reasons to grow your own, if you can, even if it is just a Patio Tomato, Pepper or Lettuce during cool months. It is one of the reasons we Top or Side Dress some of our plants with composted mature when possible, as each season begins anew and a new plant is placed in the ground. We grow organically and frugally for food, not for how the Garden looks, so you will notice our gardens are simple and hopefully, efficient.

Plastic Barrels like the one below are also a good place to start seedlings in a Greenhouse, rather than a Cold Frame or something similar. We can transplant directly from there if we want, as they usually do not need to be potted up. Below is a barrel with seedlings and straw, from last season. These Plastic Barrels can be used in the Hoop house or elsewhere.


We started our 2017 Tomatoes and Peppers indoors in early January and our White Eggplant in early February this year. The earlier we start them, the sooner we can have a harvest. I prefer White or Rosa Eggplants because they do not need to be salted and rinsed before using, as they are not bitter like some of other varieties. We grow mostly Heirlooms from seeds I harvested the previous season.

I have planted our Sugar Snap, Petite French and Snow Peas outside already and have side dressed and mulched the Chard which is coming back, outdoors. I also weeded and top dressed a few Raised Beds and Plastic Barrel Container Beds, with the plan to come back and lay a thin layer of Newspaper and Straw on top to stay ahead of the weeds and keep them down all season. Our weather is unusually warm and dry at this time, here in Zone 7, in the USA and unwanted growth in the Veggie Beds as well as Bulbs elsewhere are already coming up. We've had a pretty dry Winter thus far, which could be an indication we may have a dry summer too. Experience has taught us that method will also help the beds to stay moist, whether we have drought or not. I tried that method when I first began Vegetable Gardening, here on our one little acre and was glad I did, because we had a rare drought that year. While our Neighbors plants died due to lack of moisture, ours survived.

A great Facebook Page, for those in need of Gardening Tips and who like to find links through Facebook as well as Youtube is called 'It's Grow Time'. Below I will add some links posted there that can be found of Youtube too.

Facebook also has some excellent Groups you can join and learn from as well, I like the Growing Winter Food and Preserving Food Groups, personally, at this time, as I am interested in learning more about Fermentation. We want to be able to grow in our Greenhouse all year long when possible, in days to come. Our smaller half Hoop House, attached to our Home, is mainly being used for over wintering plants and our Hot Tub.  Today my hubby sat out a few seedlings on trays in the Greenhouse, that now need to be potted up. We will be bringing them back in, in a few days, as the Temps will be dropping again.  The mass and heat from the Hot Tub and the walls inside, that are attached to our Home, (painted a dark color to absorb heat) help to maintain the heat in there. We also have a well pump area we open up, so the colder temps can drop down there and keep the room from freezing. We have a small fan we use to blow-pipe in warm air from inside our Home.  I tried over wintering a mature Eggplant in there, but it did not make it.  We also lost our Ferns this year, as we had some record breaking cold snaps too. This fall and winter has had a highly unusual weather pattern, with record breaking highs and lows. 

Here are two sample post links from Youtube that were Posted in 'Its Grow Time', for those who are not on Facebook. EnJoy!

https://www.youtube.com/watch?v=Bc4ecvD_rMM&feature=share%20

https://www.youtube.com/watch?v=0mDvsTlaTJc


I am curious to know if People other than those I ask to consider this Blog are actually finding it and if so, how? With so many Bloggers out there... we Bloggers who Blog for the fun of it wonder how often we are being read and look for ways to help others find us. Naturally we hope through word of mouth others will find us too.

I understand there are Readers out there who never respond to Blogs, but I am asking you to please consider leaving a comment to the Request above ... even if it is anonymous or via a private email to me.

If you are inspired to do so... please tell me
where you are from and what drew you here ... and if there's anything special about this sight you like that you'd like to see more of... do tell. *smile

Thank you ever so kindly. bren

While Searching the Web Tonight came across this Link: http://www.kountrylife.com/

Below are two is Excerpts from it.  I think it's a Link well worth Mentioning. Enjoy!

Country Living, Country Skills
Country People

KountryLife.com - A Country Living Resource and Community


March 30, 2010
Welcome... We have much to share with you. Take off your shoes, grab a cup of hot chocolate or coffee and stay awhile! [About Us]

Talk With Us - our very active and friendly forum gives you a chance to discuss country life and rural living. [Let's Talk!] Stroll Down Memory Lane - browse through many memories of country living. Share your own memories with others! [Let's Stroll]


Country Living Tips - readers have provided an extensive list of tips and information which you can browse or search. [View Tips] Articles of Interest - there is an ever-growing list of interesting articles covering a variety of country topics. [Read Articles]


Photos Galore - There are current photos of country living submitted by our readers, old vintage photos, and interest-area collections. [Current Pics] [Old Pics] [Collections] And a Lot More - use the menu bar on the left to browse the site. You can also perform a site search or view a huge table of contents. [Search the Site] [Show Contents]


We're glad you are here and hope you will come back often...


Country Living, Country Skills
Country People

KountryLife.com - A Country Living Resource and Community


Community
Message Board
Country Topics
Trading Post
Memory Lane
Country Skills
Country Cooking
YT Magazine


Channels
Gardening
Livestock
The Kitchen
Machinery
Tools


Photographs
Photo Gallery
Vintage Photos
Special Collections


Fun
Country Humor
Country Sounds
Coloring Book
Interactive Story


Farm Tractors
Articles
Pictures
Tractor Parts
Tractor Manuals


Miscellaneous
ATS Store
Classic Trucks
Antique Tractors
Modern Tractors
Site Map
Links Page
Contact Us

  
Kountry Life Memories List


My Summer Vacation
The Long Dusty Road Journals - The Ride Home
Daryls Big Wreck
Gramps Puts One Over On Me
Gramps Puts One Over On My
First Solo Deer Hunt
Relatives
Sis Gets Her Horse
I Discover Beer.
Uncle Earl
Fishing
Limrats N Me
Me N Jim Corbett
Tire Rides
Cowboy Movies I Shouldnt Have Seen
I See My First Nekid Woman.
My Motorbike
Learning To Drive
Holidays Past
One July 4TH.
Found Some Golf Clubs
My New Hobby
City Cousin Visits Grandpas Farm
Whiskey Run
Christmas-1945
Missing The Simply Times...
Double Trouble
Grandparents
An Ice Cream Summer Day
Uncle Clete
I Almost Kill Granny
First Deer Hunt
Our Pond
Already Grown
At My Dads General Store
Re-Living My Childhood
Entertainment
The Feather Piller
As A Child
That Old House
Cooking Breakfast
Childhood Memories 1945
Dry Land Farm
My Childhood Of My Great Farm Visits
Mid-Night Cannonball
No Water???
Grandmas Homemede Jelly
Farming In 1930S In Oklahoma
Cotton Fields
Memories Of My Childhood
William Gray
Visit To Grandpa And Grandmas House
The Gathering
The Long Dusty Road
Home Made Ice Cream And Fire Flies
Grandmaws Apron
Fire Bug
Caterpillars
M.L. Mclemores Lone Star Baste
Dads Monumont----The Log Barn
My Tonsillectomy
Moms Big Dance & The Alfalfa Patch
The Button Box
My Country Boyhood
Popping Popcorn In The Fireplace
What I Want For Christmas
Grans Christmas Letter
Staying On The Farm
Future Memories
Thanks For Your Time
Country Memory
Map Names
That Damn Horse
Home Repairs
Afternoon Smile...
Smut
Tornado
Penny And The Copperhead
A Scream In The Night
The Old Fleming Oak
Overcome With Memories
Grandaddys Garden
The Old Log Barn
The Chicken House
Old Time Radio
My Journey
Apple-Butter Makin Time
Going To The Family Ranch
Slop Happy
Cyclone
A Childhood,Wooden Clothes Washer
Before Electricity
Flying Cat
Courtship Of Aunt Kate
Dreams Of The Alamo
Memory - First Movie
Rabbits Cooking,Grandma Said
Bozo
Mystery Journey
Mystery Trip
Childhood Farm Memories
Keep the Fences High and Tight
Goin Downtown
A Day Of Shopping
The Great Outdoors
My First Trip to the Bakery
Memory Skates
When I was 9
My First Cow Milking
Childhood Memories Shopping for Mother
My first bicycle
Theres still Country in Calif.
More modern memories
A Pan of Brownies
Life on a Dairy Farm
The Draught Pony
Hog Killin Time at my Granny n Papas.
Hollywood Candy Bars
Model T Hay Wagon
In Response to John in Ca
Memory of the Country
Potato Patch
My First Pony
W C F L
Kingfisher, High School
Trapping Days
Ocean spray days..
The Final Crop
Grandfathers horse and buggy
Hogs in the road
Life in rural Pa. in the fortys
Log houses
way back when cont.
Way back when
Fishin Peabody Creek Canyon
Uncle Toms Legend of the Bloody Hand
SCOOTER TRIP/ BOSSIER CITY LA TO TALLADEGA ALABAMA
Country Childhood
Reply to Uncle Tom
In Memory of Uncle Tom Wertz, Bedford, Pa.
Hornets
Reply to A Memory of being a kid. by Joe the Wrangler.
Fast Runner
The Haunted Tractor

Alabama Dreamin - a childhood memory.....
Goats and Bees Dont Mix
Starting School in the Fall
School
A Memory of Being a Kid
Smart Mule
Poor Mans Way of Working Cattle
Swarm
Snakes, Bugs and Outhouses
Fond Memories Growing Up in the 70s
Uncle Joe and Aunt Gracie
The Old Home Comfort Wood Cookstove.
Grandpas Farm
Ah, Those Old Harvest Day......
Kid Pranks or Outhouse Candy
The Bees Knees
Learning to be Country.
Our Farm
Last Night I Dreamed of the Ledbetter Fields
Jim Dandy
Summer Visits At My Grandma's
The Sentinels
Just Helpin Out
Mud, Mud Everywhere
Papa's M
Lost Melody
Nephew on the Farm
Ethans First G
Hay Jumping
Bees in the Bonnet
We Didn't Learn That in the City
Mixed Breed Ducks
Childhood Memories, Present Day Realities
City Chickens
Homemade Rootbeer
Just Growing Up
Early 1900s Telling
The Forgotten Way
Easy Does It
The Threshing Ring
Uncle Tyrus
Before TV
From City to Country
I Missed the Farm
Fathers
Father-Student, Son-Teacher
Plowing, or How I Became a Fathead
Thinking Back, My First Nine Years of Joy.
Going to the Grain Elevator with Grandpa
Ryans Cross Roads
Grandpas Animals
Life Before Electricity
The Early 50s on a Florida Ranch
Farm Memories - Circa 1952
Growing Up On An Iowa Farm
Growing Up On A Farm in Missouri
Growing up on a Small Farm in the 50s and 60s
Grandma's North Dakota
Raising Pigs in the House
The Three Holer
The Life and Times of Mary Porter
First Time I Drove a Tractor
The First Day I Drove Grandpas Pickup on the Farm
The Old Wood Cook Stove
Mom Could Not Believe It
My Mother Always Did It...
The Old Farmhouse
Memories of Dela Handy Just After Civil War


Add Your Own Memories
Click Photo to Enlarge

Received this in the mail years ago ... a Company was attempting to get me to join their Recipe Club.  Those who are interested in making and filling a non traditional Easter Basket this year may find these Scanned Recipes Ideas a good starting point .... and a fun Family Project over the Spring Break. Wonder how other Cookie Cutters would work? Might come up with some interesting designs.  If anyone makes these, send me your photos and I will show them.

 Click Photo to Enlarge


Enjoy!

Enough Recipes for now... Will be starting another Topic in next Blog.
Again... for those interested in filling an Easter Basket with Home Cooking, here is another suggestion:


Easy Gourmet Jelly Bean Bark
Pour Chocolate Chips into a 2 Cup Glass Measuring Cup  and microwave 2 to 4 minutes, until barely melted, being careful not to over cook.  OR melt on top of a double boiler. Stir to make sure chips are completed melted. 

Pour 2 inch puddles of Chocolate unto wax paper, spreading it out to about 1/4 inch thickness. Using your favorite flavors, while still hot, sprinkle about 15 tiny beans on each, pressing beans lightly into the Chocolate.  Allow to cool completely. Makes about 8 Pieces.

I have not tried this yet... but am considering pouring a thin layer of Chocolate inside of Easter Shaped Cookie Cutters and leaving them until they harden. If this works, will try it within other Cookie Cutters... using melted Chocolate Bars which I will premix with cracked Nuts, Peppermint or other delectable Candies; and simply pour the entire mixture into the cookie cutters to harden, may leave them in the Cookie Cutter and give them away as Gifts.   OR I am also considering pouring the entire mixture onto a wax paper lined rimmed Cookie Sheet or Jelly Roll Pan, and then using a heated Metal Cookie Cutter to cut out the shapes .... naturally all scraps and broken pieces can be eaten as well.

~~ The Resource Links added here are predominately for the benefit of those who are new or adventurous cooks ... some of these items can be found in your local Grocer, Discount or WalMart type of store for those who want to be frugal. ~~

Happy Cooking ... Enjoy!
When I think of sweet Comfort Food, I think of our Mom's Peanut Butter Fudge.  If your looking for something especially yummy to add to a Non Traditional Easter Basket, you may want to consider this easy Recipe:
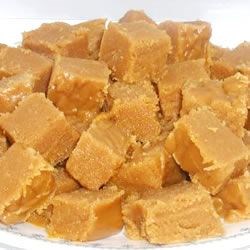

Virginia's Peanut Butter Fudge*
  • 2 Cups of Sugar
  • 1 16 Ounce Bag Large Marshmallows
  • 2/3 Cup Evaporated Milk
  • 1/4 Cup of Butter
  • 1 Tsp Vanilla
  • 1/4 Tsp Salt
  • 1 Cup Peanut Butter (Or* 6 Ounces bag of Chocolate Chips)
Combine sugar, milk and butter in sauce pan and simmer until melted. Cover top,  bring to a boil over medium heat, stirring occasionally, for 5 minutes.  Add the rest of the ingredients minus the Vanilla. Cook until melted, then add Vanilla. Pour mixture into greased small square dish.  Refrigerate until firm.  This Peanut Butter Fudge melts in our mouth.

~~ The Resource Links added here are predominately for the benefit of those who are new or adventurous cooks ... some of these items can be found in your local Grocer, Discount or WalMart type of store for those who want to be frugal. ~~

Happy Cooking ... Enjoy!
Those interested in filling Easter Baskets with Homemade Items may want to consider this tasty Recipe. Children will enjoy helping you make these Chocolate Covered Pretzels any time of the year, This is also a good way to use up left over sprinkles from Christmas Baking.

Hazelnut Chocolate Covered Pretzels*
*OR if you prefer you can use the Chocolate Bar of your choice adding in your own crushed and ground Hazelnuts or the nut of your choice. Can be made without nuts, with sprinkles or other candies substituted.   Melted peanut butter, caramel or marshmallow cream can be drizzled over them for those who are adventurous. A half of a cup of Crunchy Peanut Butter can be added for every 3 Bars of plain Chocolate.

Melt Chocolate Bars in double boiler or with a homemade double boiler or a heavy botton pot with a diffuser stirring frequently.  If using a diffuser, after the chocolate is melted, you must keep it melted by placing the sauce pot in hot water.  Do not allow hot water to overflow into the pot!

Using appetizer tongs, dip pretzels into melted chocolate then place on wax paper to dry.  Sprinkle with additional nuts or fun topping of choice if desired.  If in a hurry, place wax paper on a platter and place in freezer or refrigerator.

This makes a great Gift Idea for any time of the year.  I especially enjoy making them to give to our Neighbors during the Christmas and New Year Holiday Season.

~~ The Resource Links added here are predominately for the benefit of those who are new or adventurous cooks ... some of these items can be found in your local Grocer, Discount or WalMart type of store for those who want to be frugal. ~~

Enjoy!  Happy Cooking
Rather than write an Article today on Seed Starting, I decided to recommend this Blog from a Follower who  has been starting seeds in her Greenhouse for many years: http://riosambagardening.blogspot.com/

Although I have been starting seeds for years... I start my seeds in Windows in our home, custom built with that in mind... for those of you who have Sun Rooms, don't be afraid to use them as a Grow Room too.  I may do an article on small scale seed starting with Frugal Tips in another Blog especially if there are questions that need to be answered at Readers Requests ... in the meantime there are lots of tips here to 'get you started' *wink I suggest for the small scale seed starter you begin with Tomatoes, Peppers and Melons... as they take a while before they mature and by starting them indoors early, you will have an earlier and thus larger harvest.

Below is an Excerpt from Riosamba's  Blog  Joy of Gardening ... do visit it and check out her other Articles  and Fabulous Photos.  Here are some of her other Blogs which are links worth mentioning: My Favorite Recipes  Riosamba's Zazzle Store  Book Worm Book Reviews

SEED STARTING

Growing your own seeds is fun and easy.   I have been sowing my seeds in the greenhouse for many years.  Timing is critical for success.  Soon I will be sowing peas in a reusable polystyrene trays with  individualized pyramid shaped cells which virtually  eliminate transplant shock.   I have been using this type of tray for several years.  You may find the trays herehttp://www.groworganic.com/ , those mushroom containers, milk carton, tofu containers, yogurt/pudding cups,  they are all perfect for seeds starting.  First you need to clean the containers with a solution of 9 parts of water and 1 part of  chlorine bleach, followed by thorough rinse with water.  The picture on the left is the polystyrene tray where I sow garden pea seeds.


Need to remember too, peppers, eggplants, tomatoes are slow germinating.  You want this to start early, especially when summer is short in your area.  I sowed tomato seeds in March, peppers a little bit early in January.   The peppers have germinated well,  I spray them with chamomile tea to prevent damping off a fungus type disease.  Broccoli and cauliflower sowed in the greenhouse as well as herb seeds later this month.  The rest such as summer squash, pumpkins, lettuce, collards, kales,  carrots all directly sowed in the garden.

Use sterile soiless seed starting mixes.  Either you make them yourself or store bought. Do not use garden soil as this contains weed seed, harbor diseases and tend to be muddy, hard and reducing germination and root growth.  Seed-starting mix containing sphagnum, vermiculite, limestone, and gypsum.

Read the seed packet for intructions and carefully determine when you have to start sowing, and  tinning the seedlings.  Germination can vary from few days to several weeks.  This depending on what variety of seeds you are sowing.  With my experience, you need to sow the seed thinly, over crowding will produce weak seedlings.  Into medium barely cover seed with starting soil and gently press into mixture.

Label and date each variety as you work.  This is important, if not you will forget which variety of seed you sowed.  Water lightly with a spray bottle.  Keep the soil moist as this important for gemination.  Then cover flats with clear plastic and keep out of direct sunlight.

Remember to remove cover for an hour or two everyday to provide air circulation.  Most seeds germinate well between 70-75F.  I used heating cable that is burried under soil and the containers or flats I rest on it.  It worked well as long as you keep the heating cable on all the time.  Don't forget to remove covers once 50 to 70% germinated.  Remove flats or containers from heat to prevent seedlings grow thin and leggy.

Place seedlings in a bright, sunny window or if you are lucky a greenhouse.  If you do not have adequate light use artificial light 12 to 14 hours each day.  I used plant fluorescent light in the green house after dusk.  I keep checking the seedlings for fungus diasese.  This is their crucial time.  Seedlings require little fertilizer.  As they mature apply your favorite fertilizer


It is so much easier to thin seedling when they are larger. generaly 1-2" tall.  Thinning is necessary to prevent crowding.

Before transplanting in the garden, acclimate the seedlings outdoors 1to 2 weeks,  this is called hardening off.  Select spot out of direct sunlight and away from wind.  If nights are still cold bring them inside.  After several days, provide 3 to 4 hours direct morning or afternoon sun.  Gradually increase daily exposure to sunlight.

Move young plants to garden for transplating preferably on cloudy day or late afternoon to minimize transplanting shock.   Set out hardy plants after heavy frost has passed.  Set out sensitive plants once night time above 58F.  I covered sensitive plants with a sheet when the forcast called for low temperature.

Happy Gardening !
Hugh brings River Cottage to the City.
Segment 1 of 5 - the start.
From "River Cottage Spring" Series 1 broadcast June 2008 on Channel 4 (UK).
Hubby came across this Green, eco friendly YouTube Video Series about being connected to the land whether your in the country or city... about a Community of several Families growing their own food and live stock on a small plot of land via a UK Project last evening ... thought it might be timely having just posted regarding the Movie 'Our Daily Bread".  It seems to fit in... and some of you might find this Video Venture interesting and informative as well as inspiring ... especially if your seeking to live off the Grid as much as possible. 


By the way... in some parts of the world, this is the perfect time of the year to start your food seeds indoors. Typically that would be cool weather plants like Broccoli, Cauliflower, Brussel Sprouts and plants that take a while to grow before producing fruit, such as Peppers, Tomatoes and Melons. You don't have to have a Green House for starting your own plants from seeds.  A warm sunny window or two will work too,  Whether your interested in having a few plants on your Patio or if you want to avoid the cost of buying prestarted Veggies Plants for a larger growing area, getting a early start on the home front is usually economical in the long run.  More on this topic and other Frugal Gardening Tips coming soon.


Enjoy!


Discovered the Article written by Brenda Hyde posted below because some friends gave us Lemon Verbena as a gift ... although we grow our own Herbs and dehydrate them... (they make great gifts too), we have never grown this one, so I was eager to give it a try and to attempt to make some Lemon Verbena Essential Oil out of it, (see results at end of this Post).

Lemon Balm was the lemony Herb I discovered initially and have grown and given away for years. It self sows... so if you choose to grow Lemon Balm, do put it in a place where you don't mind babies... (which can be potted and not only given away but used to Barter with or sell for additional cash ... fresh or dryed). Lemon Balm can be used in the Recipes below as well, which also includes non food related ideas such as Potpourri and Hair Rinses.

I am posting this particular Article on Herbs presently because it has Recipes which you may want to try to use the Premixed Snack Cake Master Mix published in previous post as a Substitute for some of the Ingredients listed, (Recipes highlighted below).

Enjoy!

Using and Growing Lemon Verbena

If you've never rubbed a leaf of lemon verbena it's impossible to explain its lovely scent. Yes, it's lemon, but yet it's also a captivating fragrance that almost instantly relaxes you. To me, it's the ultimate in aromatherapy. If you grow just one lemon scented herb it should be lemon verbena. Although to grow just one lemon herb would be a shame, since they are all so wonderful.
Lemon verbena, aloysia triphylla (formally Lippia citriodora), is a native of Chile and Peru, where it grows ten to fifteen foot tall. I've read it can grow 5 foot or more in one season, but mine is only about a foot and a half tall at this point. We have had some cool nights this summer, plus I can't resist harvesting it often, which I'm sure keeps it from growing to it's full potential. Lemon verbena needs at least 6 hours of sun, and I found it did better in a traditional herb soil that was on the dry side as well. Mine started out in a bed of good soil with compost and organic fertilizer, but did not branch out or start growing until I moved it to my kitchen herb bed where it was slightly drier and had no added compost.

Lemon Verbena will not survive frost, but in cold climates it may be brought inside. Be prepared, because it will lose it's leaves, but keep it in a sunny window and water once a week to keep it from drying out. By spring it will have leaves again, and after the danger of frost has passed you can place the pot outside, burying it to the rim in your garden. It's only hardy in Zones 9 and 10, and won't withstand temperatures below 40 degrees.

Unlike some herbs, lemon verbena will retain its scent for years when dried, which is why it's not only a popular culinary herb, but also a potpourri ingredient. I dried mine in the oven on the lowest setting by placing it on baking sheets lined with parchment paper. I was very pleased with the results and it only took 2-3 hours to dry. I combined it with pineapple and apple mint, which made a nice tea.

I have also used it in herb vinegars this year combined with other lemon herbs as well as in mixtures with rosemary and thyme.

You can use lemon verbena in place of lemon zest in recipes. Virtually any fruit salad can be enhanced with its finely chopped leaves. Bury 6 lemon verbena leaves in a cup of sugar that has been placed in a covered jar or container. Use this sugar to top muffins, fruit, or sprinkle on the top of muffin batter before baking. Because the leaf is rather tough you'll need to mince it very fine if you plan on leaving it in a dish, or add it whole and remove before serving. Dried, it should be crumbed before adding to recipes.
Process 10-15 lemon verbena leaves in a food processor with the sugar from your favorite sugar cookie recipe. Continue with the recipe as directed after processing the two together.

The following recipes can also be used with fresh and dried lemon verbena or if it's not available try substituting lemon grass or lemon balm.

Lemon Verbena Potpourri

You will need:
  • dried peel of one lemon
  • 2 cups dried lemon verbena leaves
  • 1 cup dried chamomile flowers
  • 6 inch cinnamon stick, crushed
  • 1 cup dried calendula petals
  • 1 tsp. orris root powder
  • 2-3 drops lemon verbena *essential oil (optional)
Dry the lemon peel by scraping it off the lemon with a vegetable peeler, spread on paper and dry in a warm place for about 2 weeks, until crisp. Mix all the ingredients together. Seal in a tin and put in a warm place for about 2-3 weeks, shaking occasionally. Use to scent a room, or for sachets. Add more essential oil as the smell fades. Adapted from Kitchen and Herb Gardener by Richard Bird and Jessica Houdret

Lemon Verbena Syrup

Ingredients:
  • 1 cup lemon verbena leaves
  • 1/2 cup sugar
  • 1/2 cup water
Blanch the lemon verbena leaves in boiling water briefly to brighten the color, then immediately plunge into ice water to stop cooking. Place the sugar and water in a small saucepan, bring to a simmer, then remove from the heat and cool. Place the lemon verbena and cooled syrup in a blender and pulse on high for 2 minutes. Chill overnight, then strain through a fine mesh strainer. Keep leftovers refrigerated. Use with ice cream, pound cake or other light desserts, as well as fruit.

Lemon Rose Tea

Ingredients:
  • 1/2 cup torn lemon verbena leaves
  • 1/4 cup rose hips
  • Honey
Place 4 cups of water in a teakettle or medium saucepan and bring to a boil. Reduce the heat to a simmer and add the lemon verbena and rose hips. Remove from the heat and steep for about 15 minutes. Return to the heat and simmer for 1 minute. Pour into individual tea cups or mugs, sweeten with honey and serve.

Lemon Verbena Cake ~ Try using 2 Cups of Snack Cake Mix in place of Flour, Salt, Sugar and Shortening in Recipe Below

Ingredients:
  • 1-2/3 cups granulated sugar
  • 1/8 tsp. salt
  • 1 cup butter flavored shortening
  • 2 drops lemon extract
  • 2 cups cake flour or regular flour sifted several times
  • 1/4 cup fresh chopped Lemon Verbena leaves
  • 5 eggs
Cream together the sugar and shortening until well mixed. Add the eggs 1 at a time, mixing for one minute after each addition. Add dry ingredients gradually, scraping down the sides. Add the extract and the verbena leaves. Pour into a Bundt or tube pan, which is well coated with the shortening and floured. Bake at 325 degrees for 1 hour and 15 minutes or until golden brown (testing with a toothpick). Remove to a cooling rack for 15 minutes. Remove from pan onto a serving plate. Drizzle with glaze or dust with confectioners' sugar.

Lemon Verbena Scones ~ Try using 2 Cups of Snack Cake Mix in place of Flour, Baking Powder, Salt, Sugar, and Shortening in Recipe Below

Ingredients:
  • 2 cups all purpose flour
  • 1-1/2 cups rolled oats
  • 2 tsp. baking powder
  • 1/2 tsp. baking soda
  • 1/2 tsp. salt
  • 1/4 cup brown sugar
  • 1/4 cup cold butter
  • 1/4 cup finely chopped fresh lemon verbena leaves
  • 1 egg, beaten
  • 1/2 cup plain yogurt
  • 1/4 cup milk
Preheat oven to 425º F. In a large bowl, combine flour, oats, baking powder, baking soda, salt, and brown sugar. Cut in the butter with your fingers or a pastry cutter until the mixture resembles coarse crumbs. Add the lemon verbena leaves; mix until combined just combined. Make a well in the center of flour mixture. Add the egg, yogurt, and milk, stirring well. Mix in with the flour mixture to form a soft dough. Coat a12-inch cast iron skillet with a non-stick cooking spray. With floured hands, pat the dough into skillet. Cut with a sharp, serrated knife into eight wedges. (You can also pat the dough into a circle this same size on a baking sheet, and then cut into wedges.) Bake at 425º F for 15 minutes, or until lightly browned. Serve warm.
Makes 8 servings.

Raspberry-Lemon Verbena Butter
From The Herb Companion

Ingredients:
  • 1/2 pound unsalted butter
  • 1 tablespoon sugar, or to taste
  • 4 ounces fresh or frozen raspberries (not in syrup)
  • 1 small handful young, tender lemon verbena leaves
Thaw the raspberries if frozen, and pour off any excess liquid. With all ingredients at room temperature, blend butter, sugar, and raspberries until smooth (about 3 minutes). Strip out any large veins in the lemon verbena leaves, then add the leaves (chopped if you're mixing by hand) and blend until the texture is pleasing.

Lemon Butter

Ingredients:
  • 1 cup unsalted butter, softened
  • 1/4 cup fresh lemon juice
  • 2 tablespoons powdered sugar
  • Grated peel of 1 lemon
  • 4 to 6 fresh very finely minced lemon verbena leaves
Combine all ingredients in a food processor and pulse until smooth. Refrigerate covered about 2 hours until firm.

Lemon Verbena Hair Rinse

Ingredients:
  • 3 tablespoons lemon verbena leaves
  • 1 cup boiling water
Pour the boiling water over the lemon verbena leaves. Steep for about an hour. Strain the mixture, discarding herb. Use as a rinse after shampoo and conditioning your hair.

Salt-Free Herb Seasoning

Ingredients:
  • 1/2 cup dried dill weed
  • 1 tbsp. dried lemon verbena
  • 1/2 cup dried minced onion
  • 1 tbsp. dried lovage, or celery seeds
  • 2 tsp. garlic powder 2 tbsp. dried thyme
  • 1 tsp. paprika 1 tbsp. dried marjoram
In batches, grind all ingredients together. Store in an airtight container out of the sunlight and away from heat.

About The Author
Brenda Hyde is a freelance writer living on ten acres in rural Michigan with her husband and three kids. Stop by and visit her garden blog, Click: Garden of Grace & Whimsy.

After growing Lemon Verbena I would like to add: I like this Herb for it's scent. It is strong... and smells wonderful when you brush up against it or pick it and rub it on your hands. I decided to experiment with it and make some *Lemon Verbena Essential Oil and filled a small jar with the leaves, after allowing them to dry overnight to get some of the moisture out. I covered them with some Extra Virgin Olive Oil in an attempt to make Lemon Scented Oil to be used in other Projects, such as Homemade Hand Lotion or Body Spray and Room Refreshener. The Article I read also recommended the leaves simply sit in the oil (other types of Oil can be used) for up to 3-6 months in a cool dark place. I did the same thing with some Rosemary leaves... which were completely dry. It's been 3 months and I tested them today. I was disappointed to discover the Lemon Verbena Oil had more of a greenery smell than a lemony one... it definitely needs to soak longer. On the other hand... the Rosemary Oil smells a bit stronger, but it too needs to marinade longer. Will let you know how it turned out in the Spring!

For those interested in making their own Essential Oils here is a Link: www.aromatherapy-at-home.com/homemade-essential-oils.html I have not tried this Recipe yet. Plan to do so at a later date.

Here are a few more links for Lemon Verbena and it's various uses


The Pic in this next Link is of Lemon Balm and not Lemon Verbena www.ehow.com/how_5115178_make-moisturizing-oil-lemon-verbena.html


Enjoy!  Happy Gardening...